Japanese Gardens – Stone Walk
 April 7, 2012
A nobedan walk is a type of pathway, or stone walk, found in Japanese gardens. These pathways utilize unique stone pavement layout and design principles. Nobedan are often found in tea and entry gardens. It is an art of arranging various sized stones in a design that is artistic and functional. They help to create a serene atmosphere to your garden. Nobedan walks are widely used in gardens throughout Japan. This does not mean that they can not be used here Minnesota. I personal feel that nobedan walkways are become more popular as people learn more about them.
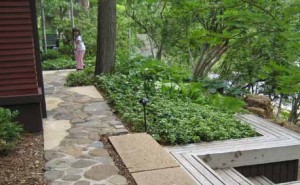
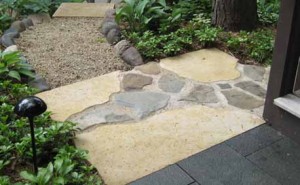
The nobedan walk in the picture is from a landscape project in Golden Valley, Minnesota. We needed to break two rules when designing and installing this nobedan, or Japanese Walkway. First we used two different types of stone with colors that were vastly different. The total landscape project has a number of different materials, including a variety of stone. We decided during the design phase of this project that we would use the nobedan walk as a transitional piece. This meant that it would have buff limestone to connect to the material found in the hillside garden and gray river jacks to connect to the materials found in the entry garden. In additional to this the nobedan walk on this project needed to have a gentle slope to connect to the entry stairs to a set of garden steps.
Nobedan paths are useful when you want to introduce straight lines or rectilinear forms in a Japanese garden, with otherwise natural curvilinear shapes. When designing these rectangle pathways it is still important to use asymmetry. This done by using two or more nobedan sections that do not align, in other words they would be intentionally offset from one another. The other practice is to set the stone in the nobedan walk so that they too are asymmetric.
How to build your own Japanese Nobedan Walkway
First decide the location in which you like to create your nobedan walkway. Once this is decided lay it out using marking paint, strings and stakes. Install batter boards around the perimeter to help in contain the mortar. Make sure that these boards are same height on all sides. This will help you when setting the stones to make sure that your nobedan is level. Lay your stones with the flat side facing up creating the surface of your walk. Although the stones are set level you can use the mortar joints between the stones to provide channels for water drain off the surface of the walk. For large nobedan style walks, or areas with potential drainage issues you will want to pitch your walkway ¼†per foot.
How do you choose the right stones?  We used river jacks in the nobedan pictured, which have a pretty weathered and water worn look to them. Although we used two very different stone materials, it is often a good idea to use stone of the same or similar type. Granite cobbles or granite flagstone with large slab like pieces for your anchor or bookend stones work great.  It is often a good idea to learn about the stones available in your local area. I personally prefer dark colored stones that have a natural look.  These walks do not need stones that are flashy; the art is in the stone arrangement and quality craftsmanship.
Where should I start when installing the stones in my nobedan walk? I recommend that you start by first setting your anchor or bookend stones, these would be your slab like pieces, if you are using any.  Then set your edge stones using a straight side for each one stone creating the perimeter of your walk. All of these stones set together should visually establish the straight line edges and geometry of your nobedan.  Avoid using edge stone that are too small as they tend to break off more easily.  Heavier stones on the edge will help to contain smaller stones set within the interior of the walk.  All of the stones in your nobedan walk should be dry laid first within your batter, or form boards.  When this is complete you can set your stones in the same arrangement next to your walk and start mixing mortar.
What should your joints look like between stones?  Good joint work is one key to quality artistry and craftsmanship.  Joints that maintain an even space between each stone look the best.  This is very difficult when working with natural stone with a variety of shapes and sizes.  Do not panic when you learn that the joints are going to vary in their width.  The goal is to have them appear to be the same; if anyone has to actually measure your joint width for consistency you have done an excellent job. Choose your spacing dimension by picking a target width which allows you a little wiggle room. This will help keep the change in width subtle and not eye catching when a stone is getting closer or further apart.  The simple rule of thumb is that the larger the stones the bigger the dimension.
It is also important to understand that the intersections of your joints are very important.  Avoid four-way and five-way intersections; strive to have all of your intersecting joints to be “T†and “Y†intersections only.  This is another area where you can really separate your craftsmanship and artistry from a project that looks amateur to one that looks professional.
Lastly with regards to joints you should also be aware of continuous lines. These occur when a string of rocks create a long mortar line.  Before you declare that you are done laying out your walk, stand up and look at your stone walkway from all sides.  Especially paying attention to the view from the long axis, as this is where these long mortar joint lines often appear.
How do you set large custom and bookend stones?  If your bookend or anchor stones are large you will need to set them first, before installing your batter boards. You will still need to layout your walk to establish where to position your stones.  Once these larger stones are set with the tops all level and in the same plane, you can then set your batter boards and continue to lay out the other stones in your nobedan walk.
Summary tips for building your own nobedan or Japanese garden stone walk
- Keep you nobedan walk level.
- Â Use batter boards, or form boards, while constructing.
- Use high quality similar stones.
- Set large custom stones first.
- Always start working at the edges and work inward.
- Use “Y†and “T†intersections
- Avoid continuous mortar joints runs.
- Maintain similar spacing between stones.
- Never use small edge or corner rocks, they will not last.
- Learn how to prepare mortar and maintain the hardness.
- Take your time creating your Japanese garden nobedan walk.
If you would like our help with your Japanese garden or a nobedan walk project please contact us, Niwa Design Studio, at 952-470-1882.
You can also visit Japanese Garden Journal for more information about Japanese Gardens.


 Posted in
  content rss